In this article
Introduction
Creating animated GIFs has become a popular way to express creativity, showcase artwork, or share engaging content on social media. Adobe Photoshop, a powerful image editing software, offers a wide range of tools for creating high-quality animated GIFs from images, videos, or custom graphics. In this detailed guide, we will walk you through the process of make a GIF in Photoshop, covering everything from basic animation principles to advanced editing techniques. Whether you are a beginner or an experienced designer, this guide will provide you with the insights you need to create stunning GIFs.
Why Create GIFs in Photoshop?
Adobe Photoshop offers several advantages when it comes to GIF creation:
Benefits of Making GIFs in Photoshop
- High Quality: Control over image quality, resolution, and file size.
- Precision Editing: Access to powerful tools like layers, masks, and filters.
- Flexibility: Ability to create GIFs from images, videos, or custom graphics.
- Animation Control: Frame-by-frame editing and timeline adjustments.
- Export Options: Compatibility with various platforms and file types.
Getting Started: Preparing Your Files
Before you begin creating a GIF in Photoshop, it is essential to gather and prepare your assets.
Step 1: Open Photoshop
Launch Adobe Photoshop on your computer. Ensure you have the latest version installed to access all features.
Step 2: Import Your Files
You can create a GIF using images or video clips. Here’s how:
- Images: Go to “File” > “Scripts” > “Load Files into Stack.” Select your images and click “OK.”
- Videos: Go to “File” > “Import” > “Video Frames to Layers.” Choose your video file and adjust the range of frames to import.
Step 3: Arrange Your Layers
If you are working with images, ensure that each layer represents a single frame of the animation.
Creating the Animation
Once your files are ready, it’s time to start building the animation.
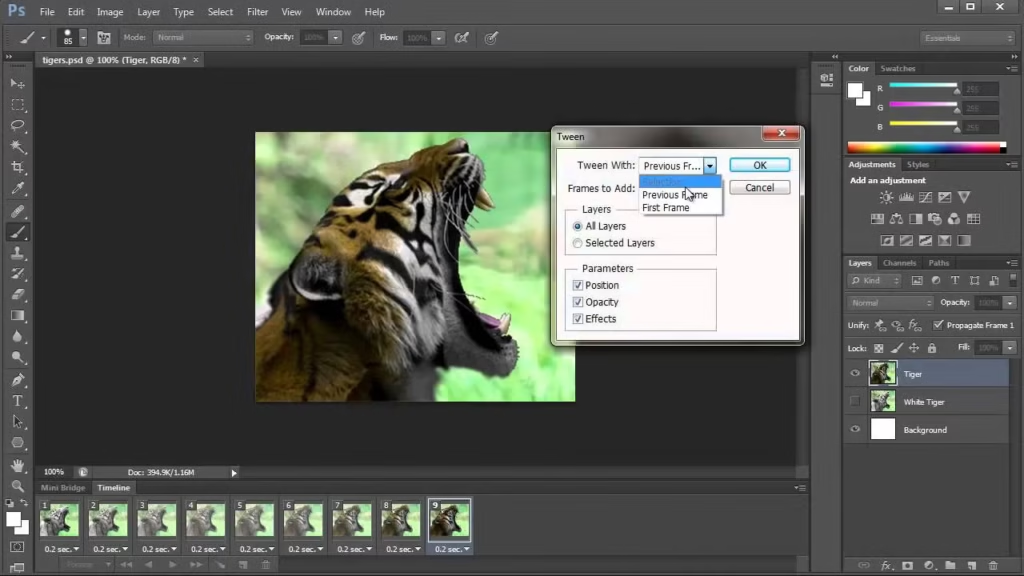
1st Step: Open the Timeline Panel
- Go to “Window” > “Timeline” to open the Timeline panel.
- Click “Create Frame Animation” if it’s not already selected.
2nd Step: Convert Layers to Frames
- Click on the “Timeline Menu” (three lines icon) and select “Make Frames From Layers.”
- Each layer will now be converted into an individual frame in the animation timeline.
Step 3: Adjust Frame Duration
- Click on each frame and set the duration using the dropdown menu (e.g., 0.1 seconds, 0.2 seconds).
- Adjust the duration for each frame as needed to achieve the desired animation speed.
Step 4: Looping Options
- Click the dropdown menu below the timeline and select the desired loop option (e.g., “Forever” for continuous playback).
Adding Effects and Enhancements
Photoshop allows you to enhance your GIF with various effects and filters.
Applying Filters
- Select a layer and go to “Filter” > “Filter Gallery.”
- Apply artistic, blur, or distortion effects to enhance your animation.
Adding Text
- Use the Text Tool (T) to add captions or titles to your frames.
- Position and style the text using the Character panel.
Layer Styles
- Apply styles like Drop Shadow, Stroke, or Glow to make your GIF more engaging.
Exporting Your GIF
Once your animation is complete, you need to export it correctly.
1st Step: Export Settings
- Go to “File” > “Export” > “Save for Web (Legacy).”
- Choose the GIF format from the dropdown menu.
Step 2: Optimize Settings
- Adjust the following settings for optimal quality:
- Colors: Reduce to 256 or lower to reduce file size.
- Dithering: Apply dithering to improve color gradients.
- Transparency: Enable or disable transparency based on your needs.
- Size: Adjust the size of the GIF if necessary.
Step 3: Save Your GIF
- Click “Save” and choose a location to save your file.
Testing and Sharing Your GIF
Now that your GIF is ready, it’s time to test and share it.
Testing Your GIF
- Open your GIF in a web browser to ensure smooth playback.
- Check for any inconsistencies or visual issues.
Sharing Your GIF
- Share on social media platforms, websites, or email.
- Use your GIF in presentations, tutorials, or marketing materials.
Common Mistakes to Avoid
Creating GIFs in Photoshop can be tricky, especially for beginners. Avoid these common mistakes:
Mistakes to Avoid
- Overloading Frames: Too many frames can increase file size unnecessarily.
- Ignoring Optimization: Not optimizing settings can result in a low-quality or excessively large file.
- Inconsistent Frame Timing: Uneven timing can affect the smoothness of the animation.
- Neglecting Testing: Always test your GIF before sharing.
Conclusion
Creating GIFs in Photoshop is a powerful skill that can enhance your digital content. By following the steps outlined in this guide, you can produce high-quality, engaging animations that captivate your audience.
Ready to bring your ideas to life? Start creating your own GIFs in Photoshop today!

Md Saizul Amin
Digital Systems Strategist · AI Agent Developer · 9+ years in digital & ITMd Saizul Amin is a digital systems strategist and AI automation engineer from Dhaka, Bangladesh. With 9+ years across IT, web development and digital marketing, he writes practical guides on technology, business, education and online growth — and builds the same kinds of systems (AI agents, websites, SEO and ad campaigns) for clients in Bangladesh, the UK and the USA.
Specialist in
Credentials & experience
- 🎓B.Sc. in Computer Science & EngineeringBangladesh University of Business & Technology (BUBT), 2017–2021
- 🤖AI Automation Engineer · Web Developer · SEO SpecialistUnique Mark Limited, Birmingham UK — 2024 to present
- 🌱IT SpecialistGreen Fund Initiative Inc., USA — 2024 to present
- 🏥Junior IT Consultant — Ministry of Health (DGHS)Built the first national Shareable Health Record website; supported 6,000+ facilities
- 🧭Head of ITWEDO Bangladesh — led IT for 50+ staff, 2021–2023